Sometimes we must stop and evaluate the systems we have in place at our dental practices and consider if there may be a better way of doing things. We need to ask ourselves, “Why do we do things the way we do?” As a dental assistant, I would always answer, “Because that is how we have always done it!” That is a lousy reason because the same old thinking will always give you the same old results. That might be perfectly fine if your practice runs like a fine-tuned machine. This means you rarely run behind schedule, and the dental team can work at a comfortable pace without being stressed. Your materials and instrument set-ups are superbly organized, your patients continually praise your team, and new patient referrals are plentiful. Moreover, you are meeting or exceeding your financial goals. As a 30-year dental assistant and now a 7-year clinical efficiency consultant, I can assure you that that is rarely the case.
Unfortunately, the reality is typically chaos! In dentistry, we have so much inventory, and it is stored everywhere. When I consult with practices, I hear clinicians’ many concerns regarding inventory management. One dentist told me when he had to see an emergency patient after business hours, it took him longer to find what he needed than it did to do the actual procedure! During another conversation, a dental assistant complained that she had to open three drawers and two cabinets and go to multiple areas to find everything she needed to prepare for a root canal procedure. A dental hygienist expressed her frustration with always waiting for the dentist to do the patient’s exam, which caused him to run behind schedule.
Here are the top three pain points and frustrations I hear when I am consulting with dental professionals:
- Leaving the treatment room mid-procedure to retrieve a missing instrument or material.
- An abundance of lost and or expired materials.
- Time-consuming room turnover and instrument reprocessing.
As clinicians, we accept this as just a part of dentistry. Dental teams unintentionally waste time and money when no proven clinical systems exist, resulting in financial and emotional stress.
Andrew Mellen is a professional organizer and speaker. He states that the average American wastes over a year looking for lost or misplaced items. He created the Organization Triangle to help people “de-stress their mess” (image below courtesy of Andrew Mellon).
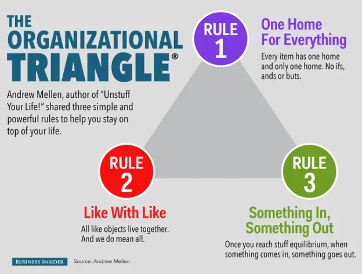
The Organization Triangle is a simple concept that everyone should practice!
- Rule 1. One Home for Everything.
Whatever the situation, we should put everything back in the same place every time.
- Rule 2. Like With Like.
Store all similar items together. Think of your pantry; all canned goods, such as soups, vegetables, beans, etc., should be stored on one shelf and organized by product. The same should apply to our dental inventory.
- Rule 3. Something In, Something Out.
Dental offices are notorious for ordering new, improved materials and not using up the old stuff. Eventually, the storage areas burst at the seams with supplies that will never be used and will eventually expire.
The Organization Triangle can be adopted into dental practices to streamline operational processes and improve workflow. Zirc Dental Products uses a similar concept with a splash of color!
Introducing Color Method
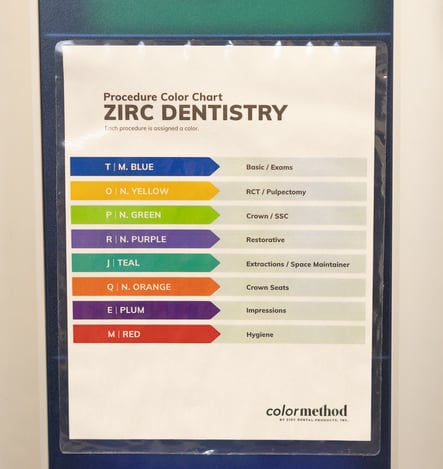
Color Method, a 2021 Cellerant Best of Class Hygiene Award winner, is a simple five-step color-code system that calms the chaos and puts the fun back into dentistry. Assigning all the instruments and materials needed for each procedure with a different color provides a visual element to identify and access all that is necessary quickly. This proven efficiency system will save you time and money while reducing stress.
Step 1: Get Colorful
Start by listing all the procedures performed in your practice and assign each their own color. All the instruments and procedure-specific materials will then be identified by their given color. Create a color-code chart to post so all employees can see the color that reflects the procedure (color chart courtesy of Zirc Dental Products).
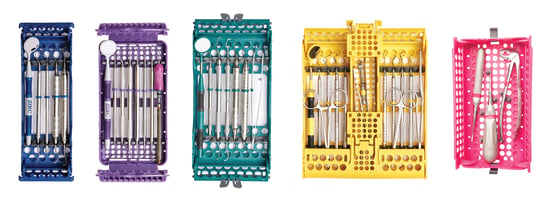
Step 2: Instrument Management
Gather all the instrument set-ups for each procedure and review them to ensure all the correct instruments are accounted for and all are present. Place colored ID tape or rings on all the instruments to reflect the color chosen for each procedure. Having them color-coded this way will signify keeping all matching-colored tools together and reduce the likelihood of them getting mixed up or lost.
Cassettes are the most efficient and safe way to organize, reprocess, and store dental instruments. Cassettes minimize the handling of loose dirty instruments to minimize the risk of getting poked and potentially exposed to an infectious disease. Cassettes lock the instruments in place in the order of use, making room turnover and reprocessing much more efficient. Remember that if a dirty instrument injures you and causes bleeding, you and the patient should go to a healthcare facility for a blood draw to get a baseline and test for diseases. When an employee leaves the office midday, the dental team is short-staffed and possibly has to cancel appointments, which will cost the practice time and money and inconvenience patients.
The cassettes with instruments will go into the washer or ultra-sonic cleaner, pouched, and into the autoclave. Zirc has resin cassettes in several sizes available in 16 colors. Once the cassettes come out of the autoclave, store the cassette on a matching-colored tray with a locking cover. The cover will allow the clinician to do pre-sets and keep everything together and clean. To comply with OSHA standards, you must transport dirty instruments in a puncture-resistant, leak-proof container. The tray with a locking cover is an excellent option. Plus, it looks professional, organized, and sanitary, which appeals to patients and enhances their experience.
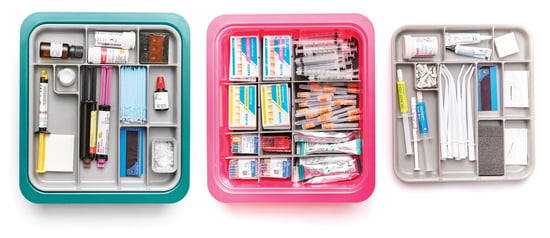
Step 3: Material Management
Utilizing a color-coded procedure tub that matches the tray and cassette to organize dental materials will save time and money versus keeping multiple rooms stocked with the same inventory. Generally, one procedure tub per procedure, per provider is required. Selecting tub accessories and components specifically made to house dental materials allows for easy access and identification of everything needed for each procedure. Every material will have its own compartment, keeping everything at your fingertips and eliminating the chance of missing, lost, or expired materials. No longer will procedures be interrupted due to a missing item. The tub acts as a portable drawer, making restocking a breeze. I recommend assigning somebody to refill the tubs once per week (image below, example of a hygiene set-up provided by Zirc).
Step 4: The Sterilization Room
The sterilization center should be considered the heart of the practice. Everything needed for each procedure is stored there. Keep all the trays with instrument set-ups and matching tubs with materials in the sterilization center. With the tubs and trays centrally located, it makes for quick grab-and-go organization. If blue identifies the restorative procedure, take a blue tub with a blue tray; you will have all the instruments and materials needed. Storing the tubs and trays in the central sterilization center allows anybody to get the required armamentarium for any procedure at any time.
The sterilization room should have four clearly defined areas: dirty for contaminated instruments, the packaging area for pouching or wrapping instruments and cassettes, the autoclave, and the clean side for tub and tray storage, and the over-stock of materials for refilling tubs.
Step 5: The Treatment Room
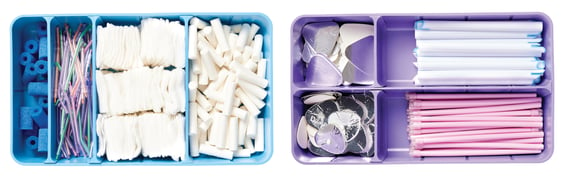
Minimalistic treatment rooms are trending. Keeping all the instruments and materials in the operatory is not recommended, and smaller treatment rooms with less cabinetry is all that is necessary. There should be enough counter space to work efficiently and house a sink for handwashing. You will need enough drawer and cabinet space to store consumable products like gauze, cotton rolls, patient napkins, etc. Zirc has recently launched a customizable, modular drawer organizer perfect for this purpose (image below).
Keep countertops free of clutter to prevent contamination from aerosols. Lastly, have a few individually pouched instruments available if one gets dropped during a procedure. The goal is to have everything needed to start in the treatment room and stay in the treatment room!
A System with Proven Results
There is no room for error in the dental operatory. Dental teams should evaluate their work practices for potential blind spots and discuss their frustrations and pain points. Dentistry does not have to be chaotic. Take your practice to its true potential by equipping the dental team for daily success. Color Method will transform practices into the most efficient version of themselves (image below courtesy of Zirc Dental Products based on case study data from Dr. Abramowski, Monticello, MN).
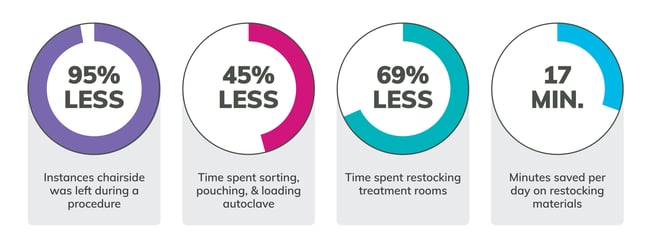
Your team will effortlessly stay on schedule when the materials and instruments are expertly managed in a color-code organizational system. The entire office will run more smoothly, giving the team the time and freedom to ensure their patients receive the best care possible. Utilizing processes to help clinicians become more efficient will result in a happier team, and a happy team becomes more productive and loyal. An efficient team makes for happy patients; happy patients become friends and refer their friends, and the dental team becomes family.